Brilliant Smart Elite Glass Wall Switches
I purchased one of these Brilliant Smart Elite Wall Switches which arrived today.


I quickly pulled off the front glass panel and could see the upper surface of the low voltage board.


The low voltage board containing the ESP8266 chip on the underside is below. There were a set of header pins which extended into the mains voltage part that I hoped would offer an easy solution for flashing.

The ESP8266 in this case is on an TYW3ES module which I think is commonly used in Tuya gear. Looking at the TYW3ES data sheet I was able to identify the pins on the module.
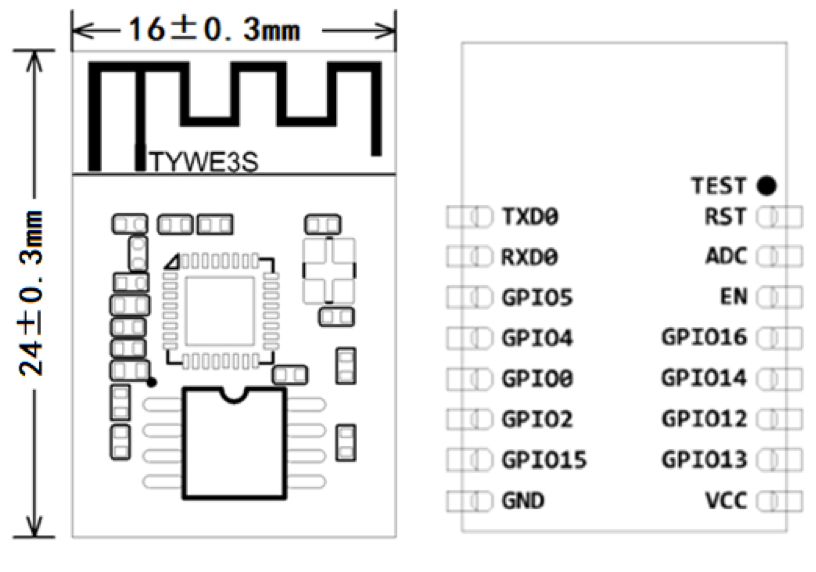
I then did some continuity checks with a multimeter and was able to identify the VCC and GND pins on the header, but unfortunately not the TX or RX pins.
I connected the VCC and GND pins to a 3.3V power supply using dupont cables, and the board came to life. Note that the red cable is VCC and the brown is GND.


I was then able to flash it with Tasmota using Tuya Convert 2.0. Thanks to the amazing contributors to both of those projects for their incredible software. They continue to impress me every time I use them. Please consider making a contribution to their projects if you find them as useful as I do.
Now I need to figure out how to configure Tasmota to get the switch working...
UPDATE: You can read how to configure this switch in this post.


Fortunately the low voltage board was easily removable, revealing the high-voltage board beneath.

The low voltage board containing the ESP8266 chip on the underside is below. There were a set of header pins which extended into the mains voltage part that I hoped would offer an easy solution for flashing.

I then did some continuity checks with a multimeter and was able to identify the VCC and GND pins on the header, but unfortunately not the TX or RX pins.
I connected the VCC and GND pins to a 3.3V power supply using dupont cables, and the board came to life. Note that the red cable is VCC and the brown is GND.


I was then able to flash it with Tasmota using Tuya Convert 2.0. Thanks to the amazing contributors to both of those projects for their incredible software. They continue to impress me every time I use them. Please consider making a contribution to their projects if you find them as useful as I do.
Now I need to figure out how to configure Tasmota to get the switch working...
UPDATE: You can read how to configure this switch in this post.


Hi, I have the same board and manage to get it to life, however I need to flash it using usb2serial and I have to find the ttx and rx pins, how did you flash it? through wifi? is there a way to use the tx rx on the board withoutt solder?
ReplyDelete