Using a USB mSATA SSD with the Raspberry Pi 4
I've recently realised that many people have experienced issues with failure of microSD cards used in a Raspberry Pi, as a result of heavy usage that the cards potentially weren't intended for.
I've been using Home Assistant to log reasonably high-frequency data from multiple sensors, and also to save the data using influxdb, and plot it using grafana. I was conscious that this may place increased strain on the microSD card over time, and so wanted to look for an alternative before my microSD card died. I was also interested to find a solution that might give the Pi 4 and Home Assistant a performance boost.
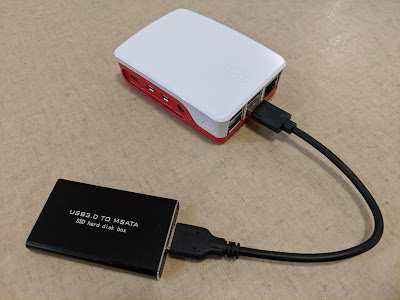
I settled on a 120GB mSata SSD and a small USB 3.0 enclosure which would allow me to connect the mSata SSD to the Raspberry Pi 4. You can see some photos below.


cd /media/<username>/rootfs
sudo rsync -aqxP var/* /media/<username>/var/
sudo rsync -aqxP home/* /media/<username>/home/
I then renamed the old /var and /home folders, and made new mount points as follows.
sudo mv var var.old
sudo mv home home.old
sudo mkdir var
sudo mkdir home
Then I edited the /etc/fstab file on the microSD card, to include the following two lines, where <partuuid-01> and <partuuid-02> are the partition UUIDs of the two partitions on the mSata SSD.
PARTUUID=<partuuid-01> /var ext4 defaults,relatime 0 2
PARTUUID=<partuuid-02> /home ext4 defaults,relatime 0 2
I also wanted to have the systemd journal writing to the mSata SSD, which I was able to do based on some useful advice by creating a folder in /var as follows.
sudo mkdir -p /var/log/journal
After running that command, the systemd journal immediately started writing to that folder. Now I'll just need to keep an eye on it to ensure it doesn't grow too large, and potentially trim it based on this advice.
Update: I've added a daily cron job to trim the journal to 7 days by running this command (more info here),
sudo crontab -e
and adding this line to the cron table:
2 * * * journalctl --vacuum-time=7d
I've been using Home Assistant to log reasonably high-frequency data from multiple sensors, and also to save the data using influxdb, and plot it using grafana. I was conscious that this may place increased strain on the microSD card over time, and so wanted to look for an alternative before my microSD card died. I was also interested to find a solution that might give the Pi 4 and Home Assistant a performance boost.
I settled on a 120GB mSata SSD and a small USB 3.0 enclosure which would allow me to connect the mSata SSD to the Raspberry Pi 4. You can see some photos below.


After connecting the SSD to the Raspberry Pi 4, I ran some quick speed tests, that suggested the mSata SSD over USB 3.0 was significantly faster than the microSD card. See below.
write to microSD
$ dd if=/dev/zero of=~/test.tmp bs=500K count=1024
524288000 bytes (524 MB, 500 MiB) copied, 12.0228 s, 43.6 MB/s
read from microSD
$ dd if=~/test.tmp of=/dev/null bs=500K count=1024
524288000 bytes (524 MB, 500 MiB) copied, 7.27456 s, 72.1 MB/s
write to mSata SSD
$ dd if=/dev/zero of=./test.tmp bs=500K count=1024
524288000 bytes (524 MB, 500 MiB) copied, 2.33377 s, 225 MB/s
read from mSata SSD
$ dd if=./test.tmp of=/dev/null bs=500K count=1024
524288000 bytes (524 MB, 500 MiB) copied, 1.47443 s, 356 MB/s
You can see that the mStata SSD is substantially faster, with read and write speeds around five times higher than the microSD card. However, it's worth noting that the microSD card was also running the operating system and Home Assistant at the time, which may have influenced the results.
Given that the majority of the reading and writing done by the Pi 4 would be in the /var and /home folders, I decided to set up partitions for these folders on the mSata SSD, and migrate those folders to the mSata SSD. I found some useful guidance here and here. I'd recommend backing up anything important before doing this.
You can see the partition setup in gparted below.

After setting up the partitions I then obtained the partition UUIDs of the two new partitions using the blkid command, which returns output similar to that below.
I then shut down the Pi, removed the microSD card and the mSata SSD USB enclosure and connected them both to a PC running Ubuntu. The partitions on both drives were automounted in the /media/<username> folder under their respective partition labels, where <username> is the username of the account you are using on the Ubuntu PC. I then copied the relevant folders from the root partition on the microSD card using the following commands.
cd /media/<username>/rootfs
sudo rsync -aqxP var/* /media/<username>/var/
sudo rsync -aqxP home/* /media/<username>/home/
I then renamed the old /var and /home folders, and made new mount points as follows.
sudo mv var var.old
sudo mv home home.old
sudo mkdir var
sudo mkdir home
Then I edited the /etc/fstab file on the microSD card, to include the following two lines, where <partuuid-01> and <partuuid-02> are the partition UUIDs of the two partitions on the mSata SSD.
PARTUUID=<partuuid-01> /var ext4 defaults,relatime 0 2
PARTUUID=<partuuid-02> /home ext4 defaults,relatime 0 2
Finally, I reconnected the microSD card, and the mSata SSD USB enclosure to the Pi, and rebooted. Fortunately the Raspbian OS seemed to boot successfully and I was off and running. Home Assistant seemed to require a restart, which I haven't quite been able to resolve the reason for yet.
I also wanted to have the systemd journal writing to the mSata SSD, which I was able to do based on some useful advice by creating a folder in /var as follows.
sudo mkdir -p /var/log/journal
After running that command, the systemd journal immediately started writing to that folder. Now I'll just need to keep an eye on it to ensure it doesn't grow too large, and potentially trim it based on this advice.
Update: I've added a daily cron job to trim the journal to 7 days by running this command (more info here),
sudo crontab -e
and adding this line to the cron table:
2 * * * journalctl --vacuum-time=7d


Hi,
ReplyDeletethis sounds like a really clever approach, especially for an existing installation.
I have a spare usb drive but with an ordinary hdd, not ssd. My setup is based on a RPi 3 using Hass.io.
And this is where I have issues... I have no clue how this container stuff works. Could you maybe tell me if it is possible to move Hass.io to a split installation on SD-card and USB-HDD (for data)?
Thank you!
Carsten
Hi Carsten, unfortunately I'm running Home Assistant using a python virtual environment, and so I don't actually have much experience with running hass.io in docker containers, or relocating them. I suspect it would be possible, but the process I've followed above might not be suitable.
DeleteI guessed that we have different environments, thanks anyways!
DeleteI'll look around what others with Hass.io did, I'm sure I'll find something sometimes.