Tasmota Smart Plugs, MQTT and Home Assistant
After getting Tasmota flashed onto Sonoff S20 and S26 smart plugs I then needed to get them configured and talking to Home Assistant.
As usual, the wealth of resources available on the internet made this a relatively easily process, and this article was very helpful.
The following commands updated the package list in Raspbian and installed Mosquitto. Mosquitto started automatically after the install.
MQTT works with the concepts of topics and messages. Devices or software tools can listen (or subscribe) to messages on a given topic, and also publish messages to a given topic. Anything interested in a particular topic can communicate and/or respond accordingly. In the case of a smart plug running Tasmota, and interacting with Home Assistant, both the smart plug and Home Assistant will be subscribed to a particular topic. If a user presses a button on the smart plug, the smart plug will turn on or off and publish a message to the relevant topic. If Home Assistant is listening to that topic, it knows what has happened to the smart plug, and can update its knowledge of the state of the smart plug accordingly. Similarly, if a user presses a button in the Home Assistant interface corresponding to that smart plug, Home Assistant can publish a command message to the relevant topic, and the smart plug which is listening to that topic can respond by turning itself on or off.
The following commands allowed me to test the MQTT broker was working. The first subscribes to the topic test, and the second publishes a message to the topic test.
After comfirming MQTT was working, I then configured some basic password authentication by following the instructions in the article I referred to above. Given I wasn't planning for my MQTT broker to be accessible from outside of my LAN I figured this would be adequate for the time being. If your environment is more exposed you may like to read this article in the Tasmota documentation regarding IoT security, and consider implementing encryption.
Next I needed to tell Home Assistant about the MQTT broker. The Home Assistant documentation has some details about this. I did this by adding the following to my configuration.yaml file.
One issue I needed to be wary of is that it is important that the MQTT broker is running before Home Assistant starts. I could make sure this happened by editing the systemd entry for Home Assistant, as per the discussion here. The first few lines of my /etc/systemd/system/home-assistant@homeassistant.service file now look like this.
Perhaps the most important part of the configuration is the Module or Template configuration. This tells Tasmota what is connected to each of the GPIO pins on the ESP8266 chip. The Module command allows you to set a series of pre-defined module configurations for common devices. The list of available modules is here. You can set the module using the WebGUI (as I did for the Sonoff S20 and S26 smart plugs), or using the Module command, which would be as follows for Sonoff S2x devices.
Alternatively, it's possible to use the Template command, which lets you set the configuration for each GPIO pin independently. There is an excellent repository of Tasmota templates here, and the commands to configure a Sonoff S26 can be seen below.
There are a number of other settings I routinely configure in Tasmota when setting up a device (such as the MQTT configuration). I've listed these below, along with some comments.
It's worth noting that although I like to set FriendlyName, MqttClient and Topic to be the same value, this has sometimes caused problems. It seems that when FriendlyName and Topic are set to the same value, sometimes Tasmota won't let me set the Topic. Usually changing the order in which I apply the settings seems to resolve this.
Also, keep in mind that you can issue multiple commands at once using the Backlog command. I maintain a spreadsheet of all of my Tasmota devices, with columns containing various unique settings, which I then combine into a single Backlog command that can be run to set every option for the device, including the Module configuration or Template.
After applying some of the settings via the commands above, the device will restart as necessary.
Although it is possible to have Home Assistant auto-detect Tasmota devices (check out Setoption19), I have generally opted for manual configuration, which requires manaully creating an entry in the configuration.yaml file for each device.
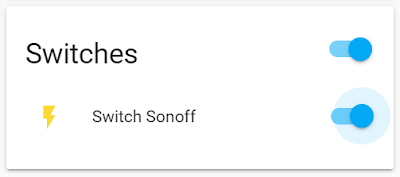
A sample entry in my configuration.yaml file would be as follows, assuming the Topic for the device was set to sp_son_01.
After adding that entry, you can check your configuration and restart Home Assistant. Hopefully your switch should then be available as an entity in Home Assistant, and you can add it to your Lovelace GUI.
MQTT
Given that Tasmota is designed to be used with MQTT, this seemed like a sensible place to start. I had Home Assistant running on my Raspberry Pi Zero W in a python virtual environment, so I set about installing the Mosquitto MQTT broker on the same Raspberry Pi.As usual, the wealth of resources available on the internet made this a relatively easily process, and this article was very helpful.
The following commands updated the package list in Raspbian and installed Mosquitto. Mosquitto started automatically after the install.
 $ sudo apt update
 $ sudo apt install mosquitto mosquito-clients
MQTT works with the concepts of topics and messages. Devices or software tools can listen (or subscribe) to messages on a given topic, and also publish messages to a given topic. Anything interested in a particular topic can communicate and/or respond accordingly. In the case of a smart plug running Tasmota, and interacting with Home Assistant, both the smart plug and Home Assistant will be subscribed to a particular topic. If a user presses a button on the smart plug, the smart plug will turn on or off and publish a message to the relevant topic. If Home Assistant is listening to that topic, it knows what has happened to the smart plug, and can update its knowledge of the state of the smart plug accordingly. Similarly, if a user presses a button in the Home Assistant interface corresponding to that smart plug, Home Assistant can publish a command message to the relevant topic, and the smart plug which is listening to that topic can respond by turning itself on or off.
The following commands allowed me to test the MQTT broker was working. The first subscribes to the topic test, and the second publishes a message to the topic test.
 $ mosquitto_sub -h localhost -t test
 $ mosquitto_pub -h localhost -t test -m "hello world"
After comfirming MQTT was working, I then configured some basic password authentication by following the instructions in the article I referred to above. Given I wasn't planning for my MQTT broker to be accessible from outside of my LAN I figured this would be adequate for the time being. If your environment is more exposed you may like to read this article in the Tasmota documentation regarding IoT security, and consider implementing encryption.
Next I needed to tell Home Assistant about the MQTT broker. The Home Assistant documentation has some details about this. I did this by adding the following to my configuration.yaml file.
 mqtt:
   broker: localhost
   client_id: homeassistant
   username: mqttuser
   password: mqttpassword
One issue I needed to be wary of is that it is important that the MQTT broker is running before Home Assistant starts. I could make sure this happened by editing the systemd entry for Home Assistant, as per the discussion here. The first few lines of my /etc/systemd/system/home-assistant@homeassistant.service file now look like this.
 [Unit]
 Description=Home Assistant
 After=network-online.target mosquitto.service
Tasmota
Next I needed to configure Tasmota, including telling it about my MQTT broker. Although some settings can be configured through the Tasmota WebGUI, there are many that can't, and I quickly realised the power of the Tasmota console and the staggering array of commands that are available.Perhaps the most important part of the configuration is the Module or Template configuration. This tells Tasmota what is connected to each of the GPIO pins on the ESP8266 chip. The Module command allows you to set a series of pre-defined module configurations for common devices. The list of available modules is here. You can set the module using the WebGUI (as I did for the Sonoff S20 and S26 smart plugs), or using the Module command, which would be as follows for Sonoff S2x devices.
Module 8Alternatively, it's possible to use the Template command, which lets you set the configuration for each GPIO pin independently. There is an excellent repository of Tasmota templates here, and the commands to configure a Sonoff S26 can be seen below.
 Template {"NAME":"Sonoff S26","GPIO":[17,255,255,255,0,0,0,0,21,56,0,0,0],"FLAG":0,"BASE":8}
 Module 0
There are a number of other settings I routinely configure in Tasmota when setting up a device (such as the MQTT configuration). I've listed these below, along with some comments.
 FriendlyName sp_son_01     # name of the device; also used to form hostname
 MqttHost mqtthost          # MQTT broker hostname
 MqttUser mqttuser          # username for connecting to MQTT broker
 MqttPassword mqttpassword  # password for connecting to MQTT broker
 MqttClient sp_son_01       # client name so that MQTT broker knows who is talking to it; I set this to be the same as the friendly name
 Topic sp_son_01            # unique MQTT topic for this device; I set this to be the same as the friendly name
 SetOption59 1              # asks Tasmota to publish a STATE message on some events; this is used by Home Assistant to know the current state of the device
 TimeZone 99                # allow configuration of standard and daylight savings times
 TimeDST 1,1,10,1,2,660     # set daylight savings time zone
 TimeSTD 1,1,4,1,3,600      # set standard time zone
It's worth noting that although I like to set FriendlyName, MqttClient and Topic to be the same value, this has sometimes caused problems. It seems that when FriendlyName and Topic are set to the same value, sometimes Tasmota won't let me set the Topic. Usually changing the order in which I apply the settings seems to resolve this.
Also, keep in mind that you can issue multiple commands at once using the Backlog command. I maintain a spreadsheet of all of my Tasmota devices, with columns containing various unique settings, which I then combine into a single Backlog command that can be run to set every option for the device, including the Module configuration or Template.
After applying some of the settings via the commands above, the device will restart as necessary.
Home Assistant
The method for manually setting up a smart plug running Tasmota in Home Assistant is well documented, and my approach relies heavily on those recommendations. You can also read more about how Tasmota works with MQTT here.Although it is possible to have Home Assistant auto-detect Tasmota devices (check out Setoption19), I have generally opted for manual configuration, which requires manaully creating an entry in the configuration.yaml file for each device.
A sample entry in my configuration.yaml file would be as follows, assuming the Topic for the device was set to sp_son_01.
 switch:
  - platform: mqtt
    name: "Switch Sonoff"
    state_topic: "stat/sp_son_01/RESULT"
    value_template: "{{ value_json.POWER }}"
    command_topic: "cmnd/sp_son_01/POWER"
    availability_topic: "tele/sp_son_01/LWT"
    qos: 1
    payload_on: "ON"
    payload_off: "OFF"
    payload_available: "Online"
    payload_not_available: "Offline"
    retain: false


For professionals who lead progress with knowledge, precision, and purpose.
ReplyDeleteEnrgtech Electronic Parts Supplier UK